Pages

Sunday, February 28, 2010

New Poppy Seed Challenges by Lisa Johnson

I'm so excited! The very talented Lisa Johnson is starting a new series of challenges. She's calling it the Poppy Seed Challenge. Here's her very first one.
She'll be posting a challenge about twice a month. You'll have a week to link your post to her blog. Each challenge will have 3 different "seeds" or elements that you should have on your project. This week's challenge requires the use of crystals (bling), a flower stamp, and the color light yellow.

Here's what I made.  I used Summer Sunrise and Enchanted Evening for my colors. (After I typed this post, I realized that the color was supposed to be "light" yellow. Sorry, Lisa!)


The flowers are from the Friends Til the End set. I masked the middle flower and stamped the images in Enchanted Evening ink. I also used the Enchanted Evening satin ribbon to tie a simple bow. 

The sentiment is from Signature Greeting. I stamped it in Versamark ink and embossed it using sapphire powder. I love how shiny it is! Then, there's my bling.

Of course, I had to finish the inside. I like to take an element from the front of the card to decorate the inside. I also try to keep the design flat so that it won't add any more bulk. I masked the flower when I stamped the leaves.
If you have time, please visit Lisa's blog and join the challenge. You'll find so much inspiration.

Saturday, February 27, 2010

Cakey Gift Card Holder

I like to give gift cards a lot. Not because I don't have time to look for an actual present, but because I don't know what people already have. So, giving them a gift card gives them that opportunity to get what they want.

I found a tutorial on how to make this gift card holder, but I can't remember where. If it comes to me, I'll post the location.

I love the vibrant colors that Doodlebug uses for their patterned paper. This is from their cupcake collection. I didn't do any stamping on this card. I used one of the stickers from this collection. Aren't the colors pretty? I love the mini cupcakes.

Here's what the card looks like when you open it. You stick the gift card into the slot that's in the center panel. When the recipient opens the card, the gift card pops up.
Thanks for stopping by.

Thursday, February 25, 2010

My First PTI Blog Hop

One of my paper-crafting goals this year is to go outside my comfort zone. I've done that on a few projects. Now, on to something bigger (at least for me).

I am participating in my first PTI Blog Hop. In fact, it's my first blog hop ever!
The challenge this month is to choose one of the designers on the PTI Design Team and to re-create a project they did on their blog. All the PTI designers are soooo very talented, it was hard to decide on a designer let alone one of their projects.

I chose the designer that first made me notice Papertrey Ink and is one of my all-time favorites, Dawn McVey. I love her work! Her creations are clean and simple yet sophisticated and full of style. She can use very little materials and create something spectacular with them. From the stamp sets she designs to the projects she creates to the color combinations she challenges us with, she continually inspires me. I'm so in awe of her!

So, thank you, Dawn! I truly appreciate all you do and your contributions to the crafting world.

I couldn't decide which of her projects to do. So, I picked a month in her archives and went from there. I clicked on July 2009 and selected these cards:


I came up with this card. I love how Dawn takes a simple image and makes it the focal point just by surrounding it with little details and vibrant colors. For this blog hop, I even bought a pin frog to showcase my card, just like Dawn.


I used my Everday Button Bits set. My cardstock colors are Berry Sorbet, Aqua Mist, Sweet Blush, and Lavender Moon. I stamped the BB: Diamonds on the base and used Polka Dot Basics on the scallop pieces. The backgrounds were stamped with Versamark Ink and the hot-air balloons were stamped with Sweet Blush.
The sentiment is also from Everyday Button Bits and stamped with Rich Cocoa Memento Ink.
Thanks for visiting! Have fun visiting the other blogs on this hop!

Wednesday, February 24, 2010

Becky's CAC #5

Hurray! I'm early for Becky's challenge this week.

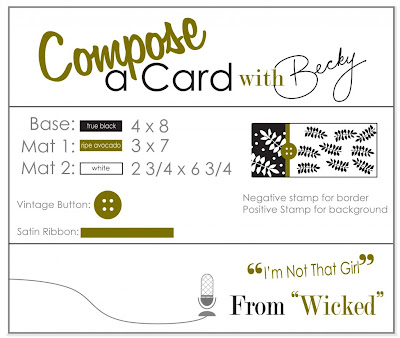
Here are the requirements and the inspiration picture for the challenge.

When I look at the inspiration picture, I think of an old-fashioned mother. It reminds me of "Mrs. Cunningham" from "Happy Days" or "June Cleaver" from "Leave It To Beaver". It is vintage comfort.

I knew that I wanted to use my Scattered Showers set and addition. So, here's what I made. 
  I used the vintage-looking umbrella. Instead of polka dots, I used the raindrop background from the additions set. I stamped the tag from the additions stamp with Aqua Mist ink and cut it out by hand. 

Here's a close-up of the sentiment. Since the inspiration gave me comfort, I wanted my card to do the same. 

 To finish the inside, I stamped the umbrella image again. 
Thanks for taking a look. 

Last of the Valentine Treats

`Please excuse the following pictures. My wonderful husband bought "me" a new camera and new lenses. I love the new camera, but prefer to use the Auto Mode since I'm quite the novice. My husband likes to experiment with the aperatures, brightness and depths. So, he kindly volunteered to take these pictures for me so he can play with the many dials and buttons. I didn't have time to take new photos so I had no choice but to use these. I guess I should be grateful that he "wants to help".

I know Valentine's Day is over, but this is the last of the treats. My kids expect me to post the stuff I make for them. They get a kick out of seeing their treats on the internet.

This is what I made for Riley's treats. It holds 8 starbursts candies (her favorites). I used the dinosaur and sentiment from the Tiny Treats set. I used the sour cream container template to hold the candy.

I colored the image with my copic markers. Nothing fancy since it's for 3 year-olds, but I still think it turned out cute. You can't tell from the picture, but I use my Sakura glaze pen to color the heart and give it a little dimension.

This was Peyton's treat for her classmates. Since the majority of her class are boys, she didn't want anything too girly. I saw this image at Pink Cat Studio. It's a digi stamp! I fell in love with it and though it would be perfect for her class. We bought the giant size pixie sticks and stuck these on the ends.
                  
I colored the little frog with my copics. Peyton colored the balloons with my Spica glitter pens. I also added some bling to the flower by coloring it with my clear Spica glitter pen.

The rest are some Tic-Tacs that I made a box for and decorated with various images and papers. I got this idea from here.

I love the hearts background. They turned out really cute.

I had fun using the Simple Valentines stamp set to make the heart image. I enjoyed adding each layer of stamp.

I used my swiss dots embossing folder to make this one. It really added another dimension.

Finally, I made this one just punching out mini hearts in the same paper to give it that monotone "embossed" look. The sentiment is from SU tiny sentiments. 

Okay, that's it for Valentine's Day. Now, I need to start working on springtime cards and a few birthday ones, too. Come back soon!

Monday, February 22, 2010

Becky's CAC #4

This was a really hectic week! I didn't have much time to do any crafting which makes me a cranky lady! But, I did have enough time to make a card for Becky's 4th challenge. Here's the requirements.

Becky's sample was gorgeous! You should check it and her video out here.

I loved her card so much, I didn't want to go off track from her sample. My problem was I didn't have a negative stamp to use. So, I decided to improvise. I used my Turning a New Leaf stamp set and I stamped it on black cardstock using Versamark ink. Then, I used white embossing powder and heat it to make it look more solid. I used my white gel pen to add some dots within the empty spaces. For the white background, I used the same set with Tuxedo Black ink.

I tried different ideas with the ribbon. I tried pleating, tying, knotting it. In the end, I kept it simple. I found this really cute button in my stash of Ripe Avocado buttons and decided to just tie it around the ribbon. This way,  you can see the cool design on it. 

I decided to do something different with the sentiment. Since there was too much blank space after I cut around the "y", I put black pearls below it.

In keeping with my goal to always finish the inside of my cards, here's what I did for this card.

Thanks for taking a peek!

Monday, February 15, 2010

Becky's CAC #3

Time for Becky's Compose a Card Challenge. Here's what the challenge was this week.

Here's what I ended up making. I've gotta say, I had a hard time with this one. My first attempt was not good. Everything went wrong with it. I'll post it after I get this post up because I want to make sure I make it in time for Becky's decision.

I really wanted to use a PTI stamp for the flower, but I've used In Bloom the last two times. I didn't want to use it again. For this card, I used a stamp from Stampin' Up. I don't remember the name of it. I'll list it later.

The sentiment is from Signature Greetings from PTI. I love when their sentiments are in different fonts.

Thanks for looking! Hope your weekend was fun!

Tuesday, February 9, 2010

Whaaaat? I Made the Top 3?!!!!

No way!  OMG!  Becky chose me as one of the Top 3 in last week's Compose a Card Challenge. Click here to take a look. Wow! What an honor. I am so excited and surprised. What a great way to start the morning!

I've got to say that her challenges are a lot of fun. It really helps to have the elements of the card already given to you. If you haven't participated in her challenges yet, I highly recommend giving it a try.

Okay, I'm going to try to make something for either today's PTI challenge or the CPS Sketch challenge. I'll post again soon.

Woo hoo!

Monday, February 8, 2010

PTI's Paint by Numbers Contest

Whew! I'm staying up late so I can join this contest.
This is my color palette. I was excited about my color combo because I love vibrant colors. Raspberry Fizz and Ripe Avocado are two of my favorite PTI colors. I've also developed a fondness for Orange Zest and Terracotta Tile. I just never thought that I'd be making a card using all these colors.

I first thought I'd be using all the colors in cardstock. But, it wasn't easy getting the right balance of cardstock using all the colors. So, then it hit me! Why not do what PTI stamps are great for...make my own patterned paper using all those colors.

I decided to have the two oranges be the main color of the card and the Raspberry Fizz and Ripe Avocado to be the accent colors. I used my favorite PTI stamp set, In Bloom, and stamped the flowers in Orange Zest and Terracotta Tile. I then stamped the leaves in Ripe Avocado. I needed to incorporate the Raspberry Fizz in the pattern, but I wanted to use a tiny image. I ended up using the triple berry stamp from Out on a Limb.

Here's how my card ended up looking. I was able to use all the colors in my pallette and keep it balanced.

The scalloped Raspberry Fizz piece looked really bare so I stamped the same flower image using Versamark ink. It added some interest without adding any more color.

 Here's my sentiment. One can never have enough birthday cards.

Thanks for visiting.

Saturday, February 6, 2010

Sydney's Valentine Treats

I love making special treats for my children's class. It's just that I sometimes find myself not having enough time to do so. This time around, I started planning their Valentine's Day treats in advance. These are Sydney's treats for her classmates.

I used Stampin' Up's mini milk carton die. I love this die! It's the perfect size to hold treats. These hold 9-10 Hershey's Kisses. I've also put about 10 Starbursts in them.  The image and sentiment are from PTI's Tiny Treats: Valentine's set. I colored the image with my Copic markers. I know the coloring isn't very good, but I didn't want to spend too much time making them perfect. These are for 1st graders and I had to make 30 of them!
I used inexpensive cardstock and patterned paper since these are for kids whose main objective is to get to the treat inside, rather than saving the packaging. For this picture, I made one carton using a piece of PTI's Simple Valentine paper. The tag was made with PTI's Heart Prints and Simple Alphabet stamp sets. I cut the tags out with SU's tag punch.
I didn't want the kids to totally ruin the carton to get to the candy so I made the bottom recloseable. On one panel, I used SU's slit punch. On the opposing panel, I used SU's slot punch. I also stamped "open here" using a stamp set I bought from Clear Dollar Stamps. Now, the kids can refill it if they want to.
Stay tuned for more pictures of Valentine treats. I still have two more classrooms to make them for.